Skip to content
LogoImagelier
  • Screenshots
  • Same Font
  • Remove Text
  • Pricing
  • Blog
LogoImagelier
  1. Home
  2. Edit Text in a Screenshot

Screenshot text editing guide

How to Edit Text in a Screenshot Without Retaking It

Try it on a sample

Editing text in a screenshot means replacing the words in a flat capture — a button label, a heading, a number in a dashboard — while the rest of the screen stays exactly as it was. Because a screenshot has no text layer, you either rebuild the area by hand in Photoshop, cover the old words and retype them in Canva, or let an AI image text editor like Imagelier erase and re-render the line for you. This guide walks through all three.

Updated October 6, 2026 · Written by the Imagelier team

Try it on a sample screenshotCompare the 3 methods
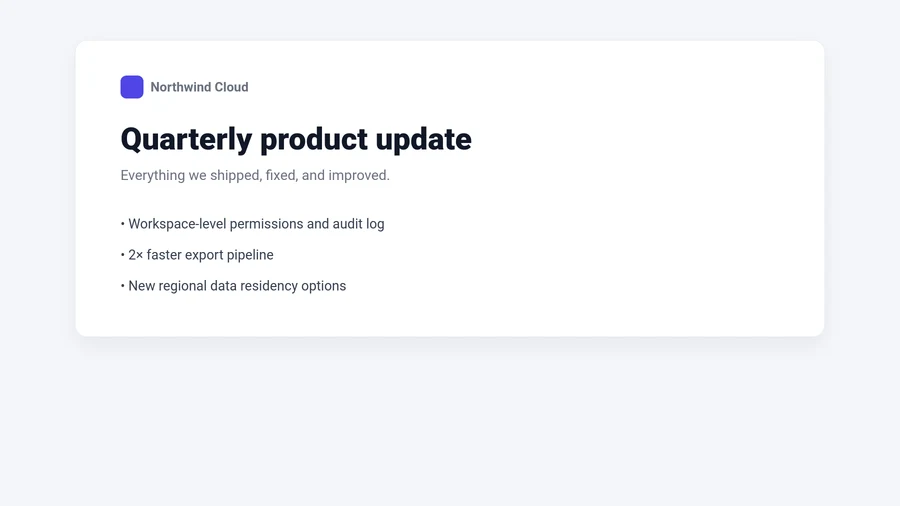
beforeUI screenshot before replacing the heading text with Imagelier
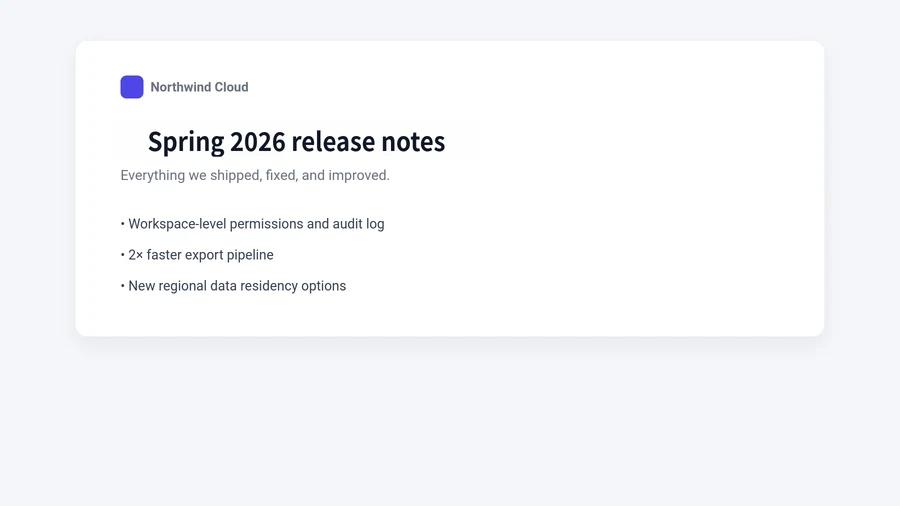
afterUI screenshot after replacing the heading text with Imagelier

A real run from the live pipeline: the heading of a UI screenshot replaced, background restored. The sample button above opens the same screenshot in the editor — no sign-in needed to try it.

Quick answer

How do I edit text in a screenshot?

Upload the PNG or JPG to an AI image text editor, click the line of text it outlines, type the new words and apply. The old words are erased, the background behind them is rebuilt, and the new text is set at the original size, weight and color — the rest of the screen stays as it was, so there is nothing to re-capture. Without an AI editor, you can rebuild the area in Photoshop or cover and retype the text in Canva on flat backgrounds.

Why you can’t just select the text

A screenshot is a flat raster image. The moment you capture a screen, every button label, heading and menu item stops being text and becomes pixels. There is no text layer to click and no font to change. That is why markup tools in Windows and macOS can draw on top of a screenshot but cannot change the words underneath.

Changing a word therefore means solving three problems:

  1. Remove the original letters without leaving smudges.
  2. Rebuild the background that was behind them.
  3. Render new text that matches the original UI style.

The three methods below solve them with different trade-offs between speed, control and cost.

3 ways to edit text in a screenshot

Method 1

Use an AI image text editor (fastest)

An AI text editor does the three hard parts for you: OCR finds the words, inpainting erases them and rebuilds the background, and the new text is rendered at the original size, weight and color. This is how Imagelier works, in the browser with nothing to install.

  1. 1

    Start from the cleanest capture you have

    Use the original PNG rather than a copy that was re-saved by a messaging app or email. JPEG compression adds noise around letter edges, which makes both detection and background repair harder. Keep 2x captures from high-DPI screens — more pixels per letter means a crisper result.

  2. 2

    Upload the screenshot

    Open the editor and drop in a PNG, JPEG or WebP. Sign in with Google or email and a new account gets 2 free edits, exported at 720 px with a small watermark — enough to judge whether the edit works.

  3. 3

    Let OCR find the text

    Each line of text is outlined and clickable. Screenshots are one of the friendliest inputs OCR ever sees: system-rendered, perfectly horizontal text on flat UI surfaces. If a tiny caption is missed, crop tighter around that area or brush over the words to select them.

  4. 4

    Click a line and type the replacement

    Type the new wording and apply. Keep it close to the original length — buttons, labels and table cells were laid out around the old string, so a much longer replacement will crowd the layout.

  5. 5

    Zoom in, compare, download

    Check letter spacing, the baseline and the area where the old text was removed. If you see faint traces, try a shorter replacement or a tighter crop. Pro exports full resolution (up to 4096 px) without a watermark.

Open the editorTry a sample screenshot

Method 2

Rebuild the area by hand in Photoshop (most control)

Photoshop gives pixel-level control, at the cost of time and a subscription. It is worth it when the background behind the text is complex or the edit has to be perfect at very large sizes.

  1. 1

    Select the old text

    Zoom in and draw a selection with the Rectangular Marquee or Lasso tool, a few pixels larger than the letters.

  2. 2

    Remove it

    On a flat UI surface, sample the background with the Eyedropper and fill the selection. On gradients or textures, use Edit → Content-Aware Fill and clean up edges with the Healing Brush.

  3. 3

    Find the font

    Type → Match Font suggests similar typefaces from a selection of the original text. Most interfaces use a system sans-serif such as SF Pro, Segoe UI, Roboto or Inter.

  4. 4

    Retype and align

    Use the Type tool at the original size, sample the exact text color with the Eyedropper (UI grays are rarely pure black), and line the baseline up with the neighboring text.

  5. 5

    Export as PNG

    File → Export → Quick Export as PNG keeps the screenshot lossless.

Method 3

Cover and retype in Canva or any design tool (free, flat backgrounds only)

If the text sits on a solid color, you can hide it under a matching shape and type over it. This works in Canva, Figma, Keynote or Google Slides. Canva Pro also has a Grab Text tool that turns text in an uploaded image into an editable text box.

  1. 1

    Place the screenshot on a canvas

    Create a design with the same pixel dimensions as the screenshot and set the image as the background so nothing gets scaled.

  2. 2

    Cover the old words

    Draw a rectangle over the text and give it the exact background color from the color picker.

  3. 3

    Add a text box

    Pick a close font (Inter, Roboto and Open Sans match many apps), then set the size and color to match the surrounding text.

  4. 4

    Download as PNG

    Export at the original size. On gradients, photos or shadows the covering shape will show as a visible patch — use method 1 or 2 there.

Which method should you use?

Markup tools annotate, design tools recreate, Photoshop retouches, and an AI text editor replaces. If the screenshot is correct except for a few words, replacement is the fastest path.

ToolBest forHow it handles the textTrade-off
AI image text editor (Imagelier)Replacing existing words in a flat captureOCR detects the line, AI erases it and restores the background, replacement is rendered in placeFocused on text replacement, not a full design suite
PhotoshopPixel-perfect retouchingManual selection, fill or Content-Aware Fill, retype and match the font by handSlow and paid; overkill for a one-line fix
Canva / design toolsSolid-color backgrounds, or rebuilding the screen as a designCover the old text with a matching shape and add a new text boxPatches show on gradients and textures
macOS Preview / Windows Snipping ToolQuick annotationDraws boxes, arrows and new text on top; the original words stay underneathCannot remove or replace existing text

Comparing in more depth? See Imagelier vs Photoshop and Imagelier vs Canva.

The screenshot edits teams actually need.

Screenshots go stale faster than the products they show. These are the everyday, above-board reasons to update one instead of capturing it again.

UI mockups & design reviews

Swap placeholder copy, sample names, or outdated labels in interface mockups before a design review or stakeholder walkthrough.

Product demo screenshots

Refresh feature names, sample values, or pricing in marketing and demo screenshots without re-staging the whole app.

Screenshot localization

Replace on-screen strings with translated wording when preparing app screens and UI examples for another market.

Docs, tutorials & support training

Fix a typo in a help-center capture, update a renamed button in a tutorial, or prepare support training material that uses placeholder customer data.

Tips for cleaner screenshot edits

  • Prefer PNG sources over JPEG, and recapture instead of editing a re-compressed copy.
  • Keep the replacement close to the original string length.
  • Match the text color exactly — UI grays are rarely pure black.
  • Edit one region at a time and review each before moving on.
  • Replace real names, emails and order numbers with placeholders before sharing a screenshot in docs or support articles.
  • Treat the output as a draft until you have zoomed in and inspected it.

Built for honest edits. Here is the line.

A screenshot editor is only useful if people can trust what it is used for. Imagelier is designed for updating visuals you own or maintain — not for misleading anyone about what really happened on a screen.

What it is for

  • Your own product screens, mockups, and demo assets
  • Localizing UI examples and app screenshots for another market
  • Documentation, tutorial, and support training material you maintain
  • Replacing real customer details with placeholder data

What we do not allow

  • Presenting an altered screenshot as an authentic record of a real conversation or transaction
  • Impersonating a real person or organization
  • Harassment, defamation, or fraud
  • Removing watermarks or attribution, and any adult or exploitative content

See what Imagelier won’t do; the full acceptable-use policy lives in the Terms of Service. Reports of prohibited use are reviewed via the contact page.

Questions about editing screenshot text

Can I change the text in a screenshot without retaking it?

Yes. Upload the screenshot, click the line of text the editor outlines, type the replacement and download the result. The original words are erased and the background is rebuilt, so there is no need to re-stage the app or rebuild the mockup.

Can I edit text in a screenshot without Photoshop?

Yes. A browser-based AI image text editor handles the full detect, erase, restore and re-render workflow you would otherwise do by hand in Photoshop. For a one-line fix it is much faster, and there is nothing to install.

Why does my edited screenshot text look blurry?

Usually the source is the problem: the screenshot was scaled down or saved as a compressed JPEG before editing. Start from the original full-resolution capture. Free exports are also capped at 720 px, which softens large screenshots; Pro exports go up to 4096 px.

Should screenshots be PNG or JPEG?

PNG. Screenshots are mostly flat color and sharp edges, which PNG stores losslessly; JPEG adds compression noise around letters. If you only have a JPEG, the workflow still works — see how to change text in a JPEG without Photoshop.

Will the replacement font match the original UI font?

Closely. Size, weight and color are matched from the original, and most UI text is a standard sans-serif, so the result usually blends in. Custom branded typefaces are harder — keep replacements short and check the spacing. More on this in editing text with the same font.

Can I edit a screenshot taken on my phone?

Yes. Phone screenshots are high-resolution PNGs, which makes them good inputs. Upload them in the mobile browser the same way as desktop captures.

Is it OK to edit the text in a screenshot?

It depends on what the edit claims. Updating your own product screens, mockups, localized UI examples or documentation captures is normal content work. Presenting an altered screenshot as an authentic record of a real conversation or transaction, or impersonating someone, is prohibited by the Terms of Service.

What happens to the screenshots I upload?

Uploads are used only to run the editing pipeline — OCR, inpainting and rendering — and are kept under the retention rules in the Privacy Policy, which also lists every third-party processor involved.

Is it free?

Trying it is: sign in and a new account gets 2 free edits, downloaded as watermarked 720 px results, and the built-in sample works without signing in. Full-resolution output without a watermark is part of Pro at $9/month, or a one-time Edit Pack — see pricing.

Update your first screenshot in the browser.

The editor lives on the homepage and works on any image with readable text — screenshots, mockups, menus, and posters alike. For the bigger picture beyond screenshots, read the guide on how to edit text in an image with AI.

Open the editorTry a sample
LogoImagelier

AI image studio for editing text inside images

X (Twitter)
Product
  • Features
  • Pricing
  • Edit Text in Screenshots
  • Edit Text With the Same Font
  • Remove Text from Image
  • Imagelier vs Photoshop
  • Imagelier vs Canva
  • FAQ
Free Tools
  • SVG to PNG
  • WebP to GIF
  • Black and White Image
  • Rounded Corners
  • Invert Image
  • Rotate Image
  • Flip Image
  • Brighten Image
  • Merge Images
  • All Free Tools
Resources
  • Blog
  • Changelog
Company
  • About
  • Contact
Legal
  • Cookie Policy
  • Privacy Policy
  • Terms of Service
  • Responsible Use
© 2026 Imagelier. All Rights Reserved.Operated by X2Y AI LABS LTD · Registered in England and Wales, No. 16539178 · 71-75 Shelton Street, Covent Garden, London WC2H 9JQ
Featured on
  • Twelve ToolsTwelve Tools
  • ToolPilotToolPilot
  • PostmakePostmake
  • ToolDirsToolDirs
  • DeepLaunch.ioDeepLaunch.io
  • BestskyToolsBestskyTools
  • NavFoldersNavFolders
  • The SaaS Dir
  • Artificin
  • Findly
  • Dang.ai